Set your screen on the defender's numbers (head hunt).
Communicate -- call the ball handler's name to let her know you're coming to set a screen for her.
Come to a jump stop with your feet shoulder-width apart.
Bend your knees when setting the screen.
Place your hands in front of your midsection.
Set the screen approximately an arm's length away from the defender.
Be firmly set and ready for contact.
Hold all screens for a "two count."
Move with purpose - make reads and react depending on how your defender gives help on the ball.
Roll to the basket with the ball handler facing the ball.

It’s not enough to do your best; you must know what to do, and THEN do your best.” – W. Edwards Deming
Tuesday, January 31, 2012

DAVE STAHNKE's Top 3 coaching points
1. Dictate Tempo
-Control the Tempo Offensively and Defensively
-Offensively->Be able to effectively execute at the pace that is required to give our team the best opportunity for victory.
-Defensively->Be the aggressor and create offense with our defense. Build indecision in our opponents by utilizing multiple starting points and intensities of our Man to Man Defense, while incorporating Zone Presses.
2. Mental and Physical Toughness
-Individual Players and the Team as a whole will display attributes within their play and actions which exude Mental and Physical Toughness. These traits will be revealed by consistently and noticeably carrying out the following 12 actions and philosophies:
-No Softness Allowed
-Respond to Adversity and Success with Class at All Times
-32 Minute Goal Line Defense
-Extreme Ball Pressure
-Take the Charge
-Refuse to get Screened
-Fight Over Top of Screens
-Nobody Cuts Your Face
-Think the Game->”Time and Score/Shot Selection”
-Want the Ball->”Loose Balls and Rebounds”
-Strong with the Ball->”Catch and See” “Rip It/Sweep It” “Chin It”
-Be a Finisher->”Attack the Rim” “Don’t Take the Path of Least Resistance”
3. DEFENSE is a Constant!
-Defense is the heart and soul of a basketball team. For a team to do well consistently, they must play great Man to Man Defense. The name of the game is to make things happen. Our players will make things happen each and every possession. There is No Glory in Defense, Just Victory!
Teach Defense in Six Practices
1st Practice
The keys of man defense to teach at your first practice include: stance and position; defense on the ball; and defense off the ball. Here are the drills to use.
Command Drill. This drill is used to get everyone loosened up and ready to go. Divide your players into three lines within the width of the court. The coach stands in front of the players with a ball. Issue each of the following eight commands and the players respond:
Zigzag The Floor. Create two court-long lanes from the sideline to the foul-lane line and from the foul-lane line to the sideline. Players must stay in their lane. One player uses a ball and one plays defense. The defender moves with the offensive player as they go down the court. When the defender reaches the sideline, the defender continues out of bounds for a one-third step (to make sure he or she is not passed by the offensive player) and the defender plants the outside foot and pivots on it to change directions. Initially, this is a slow and deliberate drill as players learn not to hop to change directions.
Shadow. A player is in a defensive stance on the sideline facing the court. Three or four players line up in a row facing the first player. On the whistle, the player in the defensive stance moves back and forth, forward and backward. The players lined up opposite attempt to move with the defender. After 20 seconds, rotate another player to the sideline position.
Stop & Go. Use this drill to teach defenders to sprint ahead of the ball to get a stop rather than running with the dribbler. One player has a ball and starts dribbling the length of the court. Another player, the defender, sprints ahead of that player and attempts to force the offensive player to pick up the dribble. Once the dribble is picked up, the defender uses his or her body to remove space and uses hands to trace the ball.
Defensive Position (Shell). The drill starts with five offensive players spaced around the arc and five defenders on the baseline. The coach is under the basket with a ball. Pass the ball to one of the offensive players. On the pass, the defenders sprint out to defend. The defender on the ball breaks down the receiver. The other three defenders use proper breakdown techniques to ensure their offensive player does not just drive past them. The player now with the ball holds it for a two-count, then passes to a teammate. Offensive players only are allowed to pass. Make sure the help defenders are sagging to the paint and recovering on the pass. Eventually, feel free to add that offensive players can shoot off the pass catch.
Shell Penetration. The variation to the Shell Drill entails offensive players only scoring off a dribble drive. So, the goal of each offensive player is to split two defenders. Defenders must be in a position to help and deny the drive. Let the teams play until either the offense scores or the defense gets a turnover.
Jump To The Ball. A coach is on the right wing with an offensive player dribbling at the top of the key with a defender guarding the dribbler. The offensive player passes to the coach. On the pass, the defender takes one quick retreat step toward the pass. The result of this step is that the defender has the left hand and foot up toward the "line of the ball" and the right foot back a bit. The offensive player tries to cut across the face of the defender to receive a return pass.
Shell Cutter. This drill is just like the Shell Drill but the offense only uses cuts off the passes. This allows the defense to focus on the "jump to the ball" technique. The coach passes to an offensive player and the defenders break down the players they are guarding. The ball moves around the perimeter and any offensive player can cut to the basket from any spot on the floor. If the cut is not successful, one of the other offensive players replaces the cutter. Have the defense stay in the original areas as it helps create game-like mismatches.
Help & Recover. Have two players on the wing and a player at the top of the key with a ball on offense. Place three defenders opposite the offensive players. The player with the ball drives at the defender. If the defender is beaten, the call is "Help!" and the other defensive players drop into a help position as the drive is occurring. Once the drive is stopped, the offensive player picks up the dribble. Now, the call is "5!" like in previous drills and the defenders go into full denial mode while staying between their offensive player and the ball. The player passes out to a wing, the defenders recover and now the wing drives starting the motion again.
Free-Throw Close-Out. Have four players line up on the baseline with basketballs and four players line up opposite of them at the free-throw-extended area. On the whistle, the players on the baseline pass to the players opposite them. Upon receiving the ball, the players assume a triple-threat position. The passers sprint out about halfway, then start taking short, choppy steps to break down the shooter. The defender keeps the left hand high to challenge the shot.
Progressive. This drill is used over the course of the next four practices to develop the skills for breaking down the shooter and defending the offensive player. Start with a wing offensive player and a defender in help position in the paint. The coach is stationed on the opposite wing with a ball.
Part 1. The coach throws a skip pass to the offensive player. The defender leaves the help position and charges at the shooter. The defender uses the breakdown technique of small, choppy steps to get to the ball. The offensive player holds the ball in front. The defender touches the ball and the drill ends.
Part 2. The drill starts the same as the previous except this time the offensive player catches and shoots. The defender executes the same breakdown technique. The defender calls "shot" and boxes out the shooter. Remind the defender that once the shot is in the air, the main responsibility is to deny the rebound to the shooter.
Part 3. This is the same drill except the offensive player catches and drives. The defender executes the same breakdown technique and stops penetration or forces a bad shot.
Part 4. The offensive player has the option of shooting or driving. Make a game of this drill. If the shooter catches, shoots and scores, it is worth three points regardless of the location on the floor. Any basket off a drive is worth two points.
Body/Hold/Release. Use this drill to "introduce" players to the basic movements of rebounding. Have two lines of players facing each other about two feet apart. One line is the shooters and one is the defenders. When the coach calls "Body" the defenders turn into the shooter (either the reverse pivot or a step-across turn). The defender takes a good rebounding stance. When the coach calls "Hold" the defender focuses on maintaining contact with the shooter using the elbows, back, buttocks and peripheral vision. When the coach calls "Release" the rebounder explodes forward and up, driving hands up together catching the rebound.
Shell Rebounding. This is set up like the Shell Drill but have the offensive player take a shot after a skip pass or a couple of passes. The defense must rebound. Have an assistant coach watch for players that boxed out or did not, and turn that into a competition.
Two-Player Tip. Have players line up in pairs, facing each other, each pair with a ball. Have one person toss the ball to the other. The receiver catches the ball at the height of the jump and returns it to the passer. Do this five times, then reverse roles.
2-Line Outlet. Have two lines of players start at the elbows, facing the basket. Place two managers or players on each wing. Each line has a ball. The players approach the basket and lob the ball off the backboard. They then leap forward, securing the ball at the top of their leap with both hands. Their legs should be spread wide so they have a solid base to land. They must create space before leaping, then leap forward to catch the ball. As they secure the ball, they call "Transition," which informs the other teammates that they have the ball and to start heading up the floor. Once the ball is secured, the player pivots on the outside foot and passes to the wing. Have the receivers vary their position on the floor so the rebounder has to pivot and change the angle on the pass.
2-Line Outlet Dribble. This is the same drill as the 2-Line Outlet except the rebounder takes a few dribbles toward the wing before passing.
Minnesota Rebounding. Start with three offensive players spread around the perimeter. Have three defenders in the lane in a line. Have a coach positioned in the short corner with a ball. Assign the offensive players numbers and tell the defenders their responsibility. The coach passes the ball to a perimeter player and that player shoots. The defenders must close out and defend against the assigned offensive player. Switch assignments so the defenders have to find a different player.
Three In A Row. Place a line of players at the top of the key. Have a single offensive player at the foul line and a single defender in the lane opposite of the foul-line player. A coach on the wing takes a shot (there is a coach on the other wing as well). The foul-line offensive player battles the defender for the rebound. Once the ball is secured, it is passed to the other manager. The next player in line steps up to the foul line to be defended. Once the defensive player grabs three rebounds in a row, then that player gets in line and a new defender takes the court.
Weak-Side Rebounding. Start with two offensive players on the wings defended by two other players. A coach is at the top of the key with a ball and passes to a wing. The defender on the ball handler takes a solid defensive containment posture. The weak-side defender drops to a help position. Now, the player shoots and the weak-side defender first finds their player then boxes out. The defensive team needs to get three rebounds in a row before coming off the court.
Offensive Contact. Start with three players facing the backboard to one side with the player in the middle holding a ball. The ball is tossed off the backboard the rebound is secured by that player. To secure the ball, the player catches the ball at the height of the jump with both makes making sure the ball is above the forehead and elbows out. That player now uses a two-handed power move to score. The other two players use slight contact (or more) to try to force the rebounder to miss, travel or commit a turnover.
Post Defense. Place a player or coach at the top of the key, the wing and the corner. Position an offensive and defensive player in the post. The ball starts at the top of the key and is rotated to the wing, then the corner. At each stop, check the defensive positioning of the defender. Speed it up and try it from both sides of the floor.
Tip From Behind (TFB) #1. Start with two lines of players on the baseline to the side of the basket. The line closest to the basket is the offensive line. One player is at half-court. The half-court player and the first person at the beginning of the "outside" line are defenders. The drill starts when the offensive player dribbles slowly to half-court. This is a slow, controlled dribble. The defensive player follows looking for an opportunity to flick the ball ahead as it is coming up from the floor. Make sure it is on the upward movement of the ball as the momentum of the ball carries farther in this scenario. And, the defender needs to use the arm closest to the ball to tip it so as not to reach in. On the tip, the half-court player recovers the ball and becomes an offensive player with the player who tipped the ball. Now, the original dribbler becomes the defender in a two-on-one situation.
Tip From Behind (TFB) #2. This drill is the same until the two-on-one situation after the tip. On the tip, the player who tipped the ball goes to the corner for a 3-point shot. The defender is instructed only to defend the rebounder so the player in the corner has an open shot.
Tip From Behind (TFB) #3. Place an additional player at half-court, once the transition occurs from original drill to two-on-one situation, the extra player sprints back to help on defense, which adds a sense of urgency to the two-on-one break and forces the defenders to talk as they adjust to the two-on-two situation.
Shell Screen. This just like the Shell Drill only players are allowed to screen defenders. Talk to your players about how you want them to defend screens. Communication must be stressed no matter if you plan on switching on the screen or not.
Help-Side Defense. There are two wing players on offense, a defender in the low post on the ball side and a second defender in a help position on the opposite wing player. Simulate the wing player beating the defender off the dribble. The beaten defender yells "Help!" The low-post player slides over to stop the drive. The opposite wing defender drops into the paint to protect the basket. Once the drive is stopped, the ball is passed to the opposite wing and the drill starts over from the other side.
The keys of man defense to teach at your first practice include: stance and position; defense on the ball; and defense off the ball. Here are the drills to use.
Command Drill. This drill is used to get everyone loosened up and ready to go. Divide your players into three lines within the width of the court. The coach stands in front of the players with a ball. Issue each of the following eight commands and the players respond:
- Stance. All players go from a standing posture to a defensive posture. They are focused with their heads up. This position is held for a few seconds, which gives you a good idea of who is off-balance. Pay particular attention to players being up on the balls of their feet, backs are straight and hands are out.
- Fire. All players start pumping their legs in place as a group. Heads are up, arms out and feet are moving. Keep this going for several seconds.
- Right (or Left). On this call, players move two steps in the direction indicated. Players use their hand to "dig up" at the imaginary ball in front of them. They also call out the direction they are moving with each step.
- Retreat. Players move backward using the pivot drop-step move for two steps on this call while keeping low. Eyes remain focused on the coach and their bodies are over their feet. Players must twist their hips and feet but not their torso.
- Loose Ball. Players hit the floor as if scrambling for a loose ball. Then, as quickly as possible, players get back on their feet and into a defensive posture with feet moving.
- Charge. Players fall back onto the large muscle of their buttocks. They do not flop. They need to be careful of whipping their heads and shoulders into the ground.
- Held Ball. Yell "5" and players move a step closer to you as if you are the offensive player. Players trace the ball with their hands. If you pivot away, they move closer.
- Shot. Players rise up and pivot to box out
the "shooter."
Zigzag The Floor. Create two court-long lanes from the sideline to the foul-lane line and from the foul-lane line to the sideline. Players must stay in their lane. One player uses a ball and one plays defense. The defender moves with the offensive player as they go down the court. When the defender reaches the sideline, the defender continues out of bounds for a one-third step (to make sure he or she is not passed by the offensive player) and the defender plants the outside foot and pivots on it to change directions. Initially, this is a slow and deliberate drill as players learn not to hop to change directions.
Shadow. A player is in a defensive stance on the sideline facing the court. Three or four players line up in a row facing the first player. On the whistle, the player in the defensive stance moves back and forth, forward and backward. The players lined up opposite attempt to move with the defender. After 20 seconds, rotate another player to the sideline position.
Stop & Go. Use this drill to teach defenders to sprint ahead of the ball to get a stop rather than running with the dribbler. One player has a ball and starts dribbling the length of the court. Another player, the defender, sprints ahead of that player and attempts to force the offensive player to pick up the dribble. Once the dribble is picked up, the defender uses his or her body to remove space and uses hands to trace the ball.
Defensive Position (Shell). The drill starts with five offensive players spaced around the arc and five defenders on the baseline. The coach is under the basket with a ball. Pass the ball to one of the offensive players. On the pass, the defenders sprint out to defend. The defender on the ball breaks down the receiver. The other three defenders use proper breakdown techniques to ensure their offensive player does not just drive past them. The player now with the ball holds it for a two-count, then passes to a teammate. Offensive players only are allowed to pass. Make sure the help defenders are sagging to the paint and recovering on the pass. Eventually, feel free to add that offensive players can shoot off the pass catch.
Shell Penetration. The variation to the Shell Drill entails offensive players only scoring off a dribble drive. So, the goal of each offensive player is to split two defenders. Defenders must be in a position to help and deny the drive. Let the teams play until either the offense scores or the defense gets a turnover.
2nd Practice
The keys of man defense to teach at your second practice include: jump to the ball; handling cutters; and help and recover.Jump To The Ball. A coach is on the right wing with an offensive player dribbling at the top of the key with a defender guarding the dribbler. The offensive player passes to the coach. On the pass, the defender takes one quick retreat step toward the pass. The result of this step is that the defender has the left hand and foot up toward the "line of the ball" and the right foot back a bit. The offensive player tries to cut across the face of the defender to receive a return pass.
Shell Cutter. This drill is just like the Shell Drill but the offense only uses cuts off the passes. This allows the defense to focus on the "jump to the ball" technique. The coach passes to an offensive player and the defenders break down the players they are guarding. The ball moves around the perimeter and any offensive player can cut to the basket from any spot on the floor. If the cut is not successful, one of the other offensive players replaces the cutter. Have the defense stay in the original areas as it helps create game-like mismatches.
Help & Recover. Have two players on the wing and a player at the top of the key with a ball on offense. Place three defenders opposite the offensive players. The player with the ball drives at the defender. If the defender is beaten, the call is "Help!" and the other defensive players drop into a help position as the drive is occurring. Once the drive is stopped, the offensive player picks up the dribble. Now, the call is "5!" like in previous drills and the defenders go into full denial mode while staying between their offensive player and the ball. The player passes out to a wing, the defenders recover and now the wing drives starting the motion again.
3rd Practice
The keys of man defense to teach at your third practice include: breaking down the shooter; bumping the center; running through the passing lane; and rebounding.Free-Throw Close-Out. Have four players line up on the baseline with basketballs and four players line up opposite of them at the free-throw-extended area. On the whistle, the players on the baseline pass to the players opposite them. Upon receiving the ball, the players assume a triple-threat position. The passers sprint out about halfway, then start taking short, choppy steps to break down the shooter. The defender keeps the left hand high to challenge the shot.
Progressive. This drill is used over the course of the next four practices to develop the skills for breaking down the shooter and defending the offensive player. Start with a wing offensive player and a defender in help position in the paint. The coach is stationed on the opposite wing with a ball.
Part 1. The coach throws a skip pass to the offensive player. The defender leaves the help position and charges at the shooter. The defender uses the breakdown technique of small, choppy steps to get to the ball. The offensive player holds the ball in front. The defender touches the ball and the drill ends.
Part 2. The drill starts the same as the previous except this time the offensive player catches and shoots. The defender executes the same breakdown technique. The defender calls "shot" and boxes out the shooter. Remind the defender that once the shot is in the air, the main responsibility is to deny the rebound to the shooter.
Part 3. This is the same drill except the offensive player catches and drives. The defender executes the same breakdown technique and stops penetration or forces a bad shot.
Part 4. The offensive player has the option of shooting or driving. Make a game of this drill. If the shooter catches, shoots and scores, it is worth three points regardless of the location on the floor. Any basket off a drive is worth two points.
Body/Hold/Release. Use this drill to "introduce" players to the basic movements of rebounding. Have two lines of players facing each other about two feet apart. One line is the shooters and one is the defenders. When the coach calls "Body" the defenders turn into the shooter (either the reverse pivot or a step-across turn). The defender takes a good rebounding stance. When the coach calls "Hold" the defender focuses on maintaining contact with the shooter using the elbows, back, buttocks and peripheral vision. When the coach calls "Release" the rebounder explodes forward and up, driving hands up together catching the rebound.
Shell Rebounding. This is set up like the Shell Drill but have the offensive player take a shot after a skip pass or a couple of passes. The defense must rebound. Have an assistant coach watch for players that boxed out or did not, and turn that into a competition.
Two-Player Tip. Have players line up in pairs, facing each other, each pair with a ball. Have one person toss the ball to the other. The receiver catches the ball at the height of the jump and returns it to the passer. Do this five times, then reverse roles.
2-Line Outlet. Have two lines of players start at the elbows, facing the basket. Place two managers or players on each wing. Each line has a ball. The players approach the basket and lob the ball off the backboard. They then leap forward, securing the ball at the top of their leap with both hands. Their legs should be spread wide so they have a solid base to land. They must create space before leaping, then leap forward to catch the ball. As they secure the ball, they call "Transition," which informs the other teammates that they have the ball and to start heading up the floor. Once the ball is secured, the player pivots on the outside foot and passes to the wing. Have the receivers vary their position on the floor so the rebounder has to pivot and change the angle on the pass.
2-Line Outlet Dribble. This is the same drill as the 2-Line Outlet except the rebounder takes a few dribbles toward the wing before passing.
Minnesota Rebounding. Start with three offensive players spread around the perimeter. Have three defenders in the lane in a line. Have a coach positioned in the short corner with a ball. Assign the offensive players numbers and tell the defenders their responsibility. The coach passes the ball to a perimeter player and that player shoots. The defenders must close out and defend against the assigned offensive player. Switch assignments so the defenders have to find a different player.
Three In A Row. Place a line of players at the top of the key. Have a single offensive player at the foul line and a single defender in the lane opposite of the foul-line player. A coach on the wing takes a shot (there is a coach on the other wing as well). The foul-line offensive player battles the defender for the rebound. Once the ball is secured, it is passed to the other manager. The next player in line steps up to the foul line to be defended. Once the defensive player grabs three rebounds in a row, then that player gets in line and a new defender takes the court.
Weak-Side Rebounding. Start with two offensive players on the wings defended by two other players. A coach is at the top of the key with a ball and passes to a wing. The defender on the ball handler takes a solid defensive containment posture. The weak-side defender drops to a help position. Now, the player shoots and the weak-side defender first finds their player then boxes out. The defensive team needs to get three rebounds in a row before coming off the court.
Offensive Contact. Start with three players facing the backboard to one side with the player in the middle holding a ball. The ball is tossed off the backboard the rebound is secured by that player. To secure the ball, the player catches the ball at the height of the jump with both makes making sure the ball is above the forehead and elbows out. That player now uses a two-handed power move to score. The other two players use slight contact (or more) to try to force the rebounder to miss, travel or commit a turnover.
4th Practice
The keys of man defense to teach at your fourth practice include: defending the post and tipping from behind.Post Defense. Place a player or coach at the top of the key, the wing and the corner. Position an offensive and defensive player in the post. The ball starts at the top of the key and is rotated to the wing, then the corner. At each stop, check the defensive positioning of the defender. Speed it up and try it from both sides of the floor.
Tip From Behind (TFB) #1. Start with two lines of players on the baseline to the side of the basket. The line closest to the basket is the offensive line. One player is at half-court. The half-court player and the first person at the beginning of the "outside" line are defenders. The drill starts when the offensive player dribbles slowly to half-court. This is a slow, controlled dribble. The defensive player follows looking for an opportunity to flick the ball ahead as it is coming up from the floor. Make sure it is on the upward movement of the ball as the momentum of the ball carries farther in this scenario. And, the defender needs to use the arm closest to the ball to tip it so as not to reach in. On the tip, the half-court player recovers the ball and becomes an offensive player with the player who tipped the ball. Now, the original dribbler becomes the defender in a two-on-one situation.
Tip From Behind (TFB) #2. This drill is the same until the two-on-one situation after the tip. On the tip, the player who tipped the ball goes to the corner for a 3-point shot. The defender is instructed only to defend the rebounder so the player in the corner has an open shot.
Tip From Behind (TFB) #3. Place an additional player at half-court, once the transition occurs from original drill to two-on-one situation, the extra player sprints back to help on defense, which adds a sense of urgency to the two-on-one break and forces the defenders to talk as they adjust to the two-on-two situation.
5th Practice
The keys of man defense to teach at your fourth practice include: The defensive concepts to teach at the fourth practice are: The defensive concepts to teach at the fifth practice are handling screens and help techniques.Shell Screen. This just like the Shell Drill only players are allowed to screen defenders. Talk to your players about how you want them to defend screens. Communication must be stressed no matter if you plan on switching on the screen or not.
Help-Side Defense. There are two wing players on offense, a defender in the low post on the ball side and a second defender in a help position on the opposite wing player. Simulate the wing player beating the defender off the dribble. The beaten defender yells "Help!" The low-post player slides over to stop the drive. The opposite wing defender drops into the paint to protect the basket. Once the drive is stopped, the ball is passed to the opposite wing and the drill starts over from the other side.
6th Practice
The sixth practice is a review of all the concepts stressed in the first five practices. Utilize the drills previously explained that your team had trouble with the first time around.
These are the things that I will try to instill in my athletes: love of the
sport, love of competition, willingness to sacrifice self for the good
of the team, a tireless work ethic, willingness to help others achieve,
willingness to learn new concepts, and not afraid of failure. Finally -
no whining, no complaining and don't make excuses.
"Character, so hard to develop, so easy to lose. It is both the strength by which we lead and the weakness by which we fail. Character is not something that, once attained, is permanent. Character building is a life-long task. Evaluating the state of our own character is a tricky business - we all tend to see ourselves as we'd like to be, not as we really are. Yet we need some kind of ongoing assessment if we are going to grow." -- John C. Maxwell
"Character, so hard to develop, so easy to lose. It is both the strength by which we lead and the weakness by which we fail. Character is not something that, once attained, is permanent. Character building is a life-long task. Evaluating the state of our own character is a tricky business - we all tend to see ourselves as we'd like to be, not as we really are. Yet we need some kind of ongoing assessment if we are going to grow." -- John C. Maxwell
Ten Commandments For Being a Winner
1.) When a winner makes a mistake, she says, "I was wrong." When a loser makes a mistake, she says "It wasn't my fault."
2.) A winner credits good luck for winning, even though it isn't good luck. A loser blames bad luck for losing, even though it wasn't bad luck.
3.) A winner works harder than a loser and has more time to give. A loser is always too busy to do what is necessary.
4.) A winner goes through a problem. A loser goes around it, but never past it.
5.) A winner shows she's sorry by making up for it. A loser says, "I'm sorry," but does the same thing next time.
6.) A winner knows what to fight for and what to compromise on. A loser compromises on what he shouldn't and fights for what isn't worth fighting for.
7.) A winner says "I'm good, but not as good as I ought to be." A loser says "I'm not as bad as a lot of other people."
8.) A winner would rather be admired than liked, although she would prefer to be both. A loser would rather be liked than admired, and is even willing to pay the price of mild contempt for it.
9.) A winner respects those who are superior to her, and tires to learn something from them. A loser resents those who are superior to her, and tires to find chinks in their armor.
10.) A winner feels responsible for more than her job. A loser says, "I only work here."
Not originally mine, but I like it.
2.) A winner credits good luck for winning, even though it isn't good luck. A loser blames bad luck for losing, even though it wasn't bad luck.
3.) A winner works harder than a loser and has more time to give. A loser is always too busy to do what is necessary.
4.) A winner goes through a problem. A loser goes around it, but never past it.
5.) A winner shows she's sorry by making up for it. A loser says, "I'm sorry," but does the same thing next time.
6.) A winner knows what to fight for and what to compromise on. A loser compromises on what he shouldn't and fights for what isn't worth fighting for.
7.) A winner says "I'm good, but not as good as I ought to be." A loser says "I'm not as bad as a lot of other people."
8.) A winner would rather be admired than liked, although she would prefer to be both. A loser would rather be liked than admired, and is even willing to pay the price of mild contempt for it.
9.) A winner respects those who are superior to her, and tires to learn something from them. A loser resents those who are superior to her, and tires to find chinks in their armor.
10.) A winner feels responsible for more than her job. A loser says, "I only work here."
Not originally mine, but I like it.
Monday, January 23, 2012
Teach UNITY
Use this page as a hand out to the players.
U: UNSELFISHNESS:
U: UNSELFISHNESS:
-This
is a team game. You play for the name on the front of your shirt,
that’s why your names aren’t on the back. Points, rebounds and
other stats don’t matter if it adds up to a poor effort. You
should always look for the open teammate. You should always cheer
for your teammates. You should always help a fallen teammate up off
the floor. You should always point to a teammate when they give you
an assist. Give credit to others; take blame when you are at fault.
You should care about your teammates as much as you care about
yourself. You are all equals whether you play every minute of every
game or if you barely play in any games.
N:
NEVER STOP PLAYING HARD
- As soon as you are in that gym you
need to be working hard. You need to push your teammates to work
hard. Together you will rise or fall, so you need to make sure that
you all are playing your hardest. You should never leave the court
feeling that you gave less than 100% of your effort. You should never
accept your teammates working below 100% effort level either.
I:
INVEST IN THE TEAM’S ATTITUDE
-
Success starts in your head. If you believe you are going to
lose, you probably will. Believe in yourself and each other. Be
positive with yourself and your teammates. Never put yourself or a
teammate down. Always lift them up. Cheer them on. Dive
for loose balls. Take a charge. Hustle. Develop a winning
attitude.
T:
TRUST YOUR TEAMMATES
- Believe in each other. Never think
that a teammate will let you down. Trust that your teammates will be
there to comfort you if you fail. Comfort your teammates if they
fail. Be worthy of your teammates trust. Don’t talk poorly about
them on the court, in the locker room, at school or anywhere. Trust
that the coaches are doing what they feel is best for the overall
success of the team.
Y:
YOUR ROLE – KNOW IT
- Not everyone can score every basket.
Not everyone can even play in every game. Know what your role on
the team is. Are you the defensive specialist? Are you the
rebounder? Are you going to pout and be trouble if you aren’t
scoring as much as you think you should? Are you going to cause
problems if you aren’t playing as much as you think you should?
Are you going to cheer for your teammates even if you don’t get to
play a minute of the game? Take your role and become the best you
can at it. If you don’t like your role, don’t complain about
it. Talk to the coach and ask what you can do. Every role is
important. We need someone who can score, we need someone who can
rebound. We also need someone who is willing to shut down the
other team’s best player, someone who is willing to go after every
loose ball, someone who is willing to cheer for her teammates when
they are on the bench and someone to push their teammates to improving
at every practice.
ACL Injury Prevention
The ACL or Anterior Cruciate Ligament is one of the four ligaments in the knee. It is the primary stabilizing ligament and comes into play when changing direction. There are between 250,000 and 300,000 ACL tears a year and almost all of them are among athletes. ACL tears take anything from 6 months to a year to recover from after surgery.
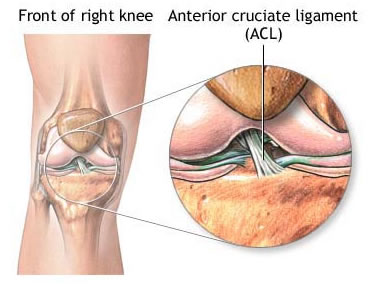
Teach young players how to move with good alignment to protect their knees. Help them to develop body awareness, strength, and balance to support knees and ankles. Have them to always jump, land, stop, and move with the knees directly over the feet. Teach them to not let their knees collapse inward. Girls must develop strength in their hips and thighs. Women are nearly three times more likely to have ACL injuries than men. And some statistics says that a female soccer player is eight times more likely to injury her ACL than a male soccer player. Researchers believe this may be due to differences in hormone levels on ligament strength and stiffness, neuromuscular control, lower limb biomechanics, ligament strength and fatigue.
Make sure that they warm up and stretch before games and practice. In your practices have them perform a variety of drills until the movement patterns are second nature and they don’t have to think about it. Teach them to say:
- Chest high and over knees
- Bend from the hips and knees
- Knees over toes
- Toes straight forward
- Land like a feather
Practice these guidelines, exercises, and drills with your team. When practicing any of these strategies, the quality of movement, rather than quantity, should be your goal.
Warm up.
- Light jogging.
- Sideways skip. Sit back, tense stomach as if you are pulling your belly button in, small steps sideways on your toes only.
- Forwards small steps. With you toes pushing up, take small steps landing with your feet flat on the ground. Your body is up right as before.
- Skipping. High knees, small steps, landing with your foot flat on the ground. Knees should be picked up as high as you can.
- Sideways skipping. Body upright with stomach in. Leading leg raised high. Feet flat to the ground.
- Backwards running. Body up right, reach back and drive with your heal.
Dynamic Non Static Stretching
- Knee grab. Grab knee and pull up towards the chest, as the knee is pulled up rise onto the toes of the standing foot.
- Heal grab. Grab heal, pull towards chest and rise up onto toes of standing foot.
- Walking knee Lunge. As above grab heal, rise up onto toes, place foot forward, lunge down keeping body upright then step forward with back foot and repeat.
- Side to side lunges. Body upright, step behind front foot, sit down on crossed legs, push up and powerfully step out with front foot, rock forwards then backwards then repeat.
- Back kicks. Rise onto toes, kick back keeping everything straight go through slowly.
- Front kicks. Rise onto toes; kick up with toes pointing back to you. Keep knee straight.
- Front kick with skip.
- Hand walk. Push up position, walk up towards hands as high as you can go then walk hands out in front of you and repeat.
Subscribe to:
Posts (Atom)